Many comments that I get from new I’m Not A Famous Blogger Crew Members and non-crew members alike have to do with getting their blogs added to SocialSpark and having them approved. There are a few places to get this information and while the information is sound I don’t think it covers it quite like this little tutorial will. So strap in because this SocialSpark Saturday post is Double Sized (I missed last week so I’m making up for it.)
Adding your Blog to SocialSpark
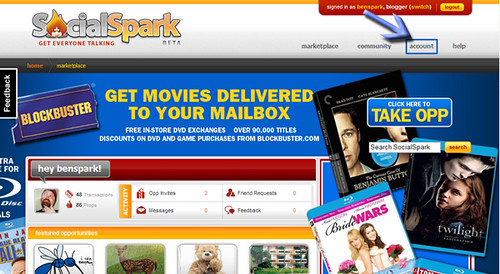
First off you need to sign into SocialSpark and mouse over the Account tab.
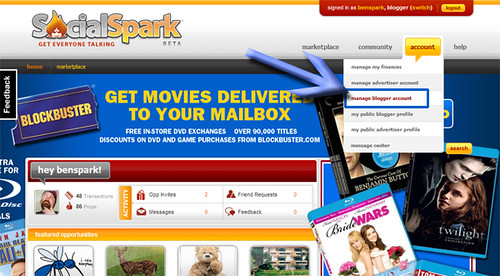
Next you will get a drop down menu of options. Choose Manage Blogger Account and Click it.
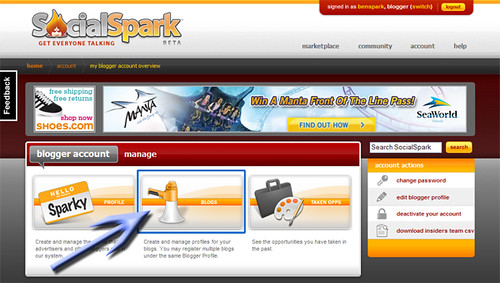
From here you are going to want to click on the Blogs field in the middle of the screen.
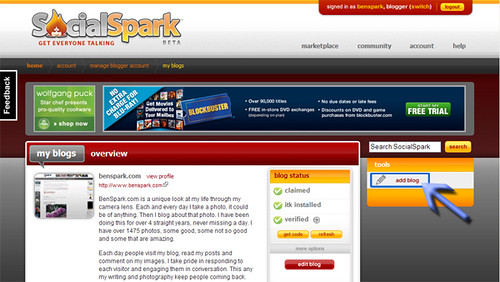
This will bring you to a list of your blogs (if you’ve already entered any). There is a link “Add Blog” Click it.
Now you are on the add blogs page. There is much to fill out here.
Click Submit at the bottom of the page and that’s it, you have now added your blog.
Are you ready to claim it and submit it for approval…
Sure you Are!
LET’S DO IT!
Claiming your blog
Assuming that you follow my instructions above and you added your blog to the SocialSpark network then you are ready to claim your blog. It is pretty easy to do this.
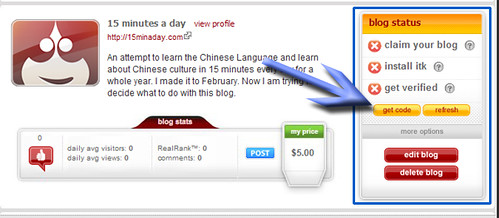
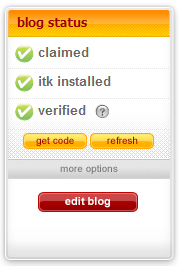
Take a Look at your blog status. You will most likely see three red X’s. This means that you have not claimed your blog. You can find out more about why you need to claim the blog by clicking the “?” next to Claim Your Blog. This is what you will see when you click the “?” next to Claim Your Blog.
“Before you get your blog approved, we need to verify that you really are the owner. We have not yet verified that you own your site. Click the Get Code button to grab the code, place it on your site either before the closing HEAD tag or somewhere between the BODY tags. Then click Refresh here to run the verification script. Once you’ve claimed the site once, you can remove the claim code (Not ITK) from your site.“
The Second red X means that you have not installed the IZEA Tool Kit (ITK), you’re going to need to do this as well. Why? Here is the explanation that you see when you click the “?” next to Install ITK.
“The IZEA ToolKit (ITK) is a suite of tools that maximizes what you can do in the IZEA Network. After you place a piece of Javascript code on your website, we begin collecting statistics that gives you a RealRank and allows you to use other network features such as PPP Direct and SocialSpark Blog Sponsorships.“
We need to take care of the first two red X’s before we can tackle #3. To do this we are going to have to tackle code. Don’t worry it is not difficult at all. Click the Get Code button. The screen will darken and a new screen will appear with three boxes of code. You should only see three boxes if code is missing from your blog. So the first time you install code you will see a box of missing code that has both of codes from the second and third boxes (So you don’t have to copy and past code from each of the boxes. That would be redundant.). Just install the missing code anywhere between the < body > tags in your blog html code.
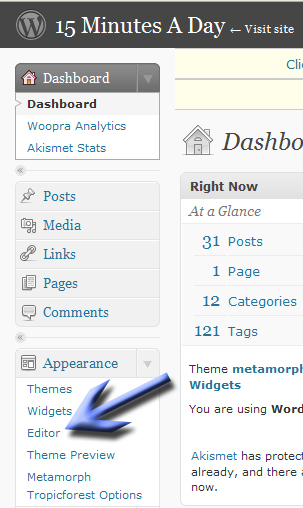
This might seem scary to some but it really is not. Working with the code is not that difficult. These instructions are for the self-hosted WordPress platform (honestly you really should have your own domain name and hosting and use WordPress, I cannot stress this enough.). Go to your dashboard of your blog. Click on Editor under Appearance.
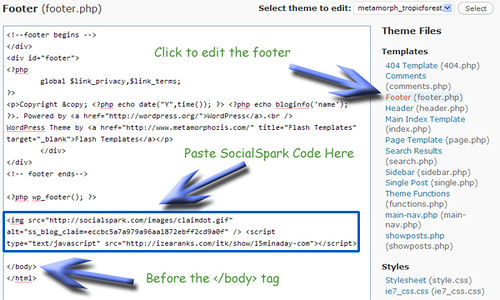
This brings you to the theme editor where you can edit specific portions of the html of your blog theme. You are most likely looking for the header or footer files. The header has the open BODY tag and the footer has the close BODY tag. The code from SocialSpark needs to go after the open BODY tag and before the close BODY tag. Highlight and copy the code from SocialSpark. Go to your theme and paste this code. Then save the file and return to SocialSpark.
Now you are back on the My Blogs page of SocialSpark and you are going to test to see if the code was added correctly (it had better be if you followed these directions). Start off by clicking the Refresh button. A spider will go out and check your code to see if the claim code is installed. If it is your red X will turn to a green checkmark. Please note that the ITK installed might not go to a green check right away. That is okay, give it a little while and click refresh again.
Once your blog status has two green checks like the one below you are ready for the last step. The most important step.
Submit your Blog for Verification
Once you have claimed your blog and added the IZEA Tool Kit to it you are ready to submit for verification and approval… or are you? Review the qualifications for having an approved blog first. This is from the Terms of Service.
“”Verified Blog”.
A blog that has been Claimed, and also meets these additional requirements:1. Blogs Only. SocialSpark only accepts blogs, and not websites, message boards, e-mails, IM or other similar services.
2. English or Spanish Only Blogs. The blog and all posts relating to SocialSpark Opportunities must be in the English or Spanish language.
3. Original Blog Content. The blog must contain original editorial content in addition to Opportunity-related or other paid posts. Blogs that exist primarily for payment will not be accepted.
4. Appropriate Content. Blogs submitted to the marketplace may not include or support: excessive profanity, violence, or racial intolerance, illicit drugs or drug paraphernalia, pornography, adult or mature content, or any other content that promotes intolerance, illegal activity, or infringes on the legal rights of others.
5. Minimum Blog Age. Blogs must be live for a minimum of ninety (90) days, counted from the date of the blog’s first post, with at least twenty (20) pre-existing posts written in the 90 days prior to registration with the SocialSpark Marketplace.SocialSpark will not accept certain blogs and Bloggers as determined by SocialSpark in its sole discretion.”
If your blog fits those qualifications and you are ready to go then it is time to submit your blog for Verification.
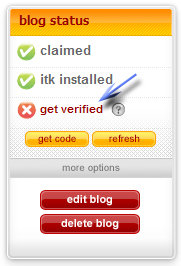
To do this you must click the Get Verified link under Blog Status.
That’s it, you do that and you are done, now you wait for Customer Love to check out your blog, a manual process to make sure that quality blogs are approved, and let you know that you are approved to take opps in the system. Your blog status should look like this.
Now start earning some money!
I am an IZEA Insider and my crew is called the “I’m Not A Famous Blogger” Crew and I want YOU to join me. Here are simple instructions on how exactly you can join my IZEA Insider Crew on SocialSpark.
